
Redirect a domain to another domain using AWS Route 53
Step by step guide to redirecting a domain name to another domain name using Amazon's Route 53 DNS web service.
Objective:
To redirect a totally separate domain to an existing domain for a website hosted on Amazon Lightsail (or with another web host) when the domain is registered with Amazons Route 53 DNS web service. Specifically in this example, when a user types the domain www.mountainseo.eu or mountainseo.eu into a web browser, they are redirected to mountainseo.co.uk
Existing website:
New (second) domain:
Assumptions:
That both domains are registered with Amazon Route53
Step by Step Guide
Step 1 - Log in to Amazon Management Console
First Step - Log in to your Amazon AWS account and go to the AWS Management Console (click on the AWS logo in the top banner) In the ‘Find Service’ search bar just enter S3 and press return or select S3 in the autocomplete dropdown.
Step 2 - Create S3 Buckets
Next, you want to create two S3 buckets - these are essentially static web hosting spaces. It’s critical that you get the name of the buckets correct as they are a key part of the process. In this example, we need to create two buckets with the following bucket names: mountainseo.eu www.mountainseo.eu The process for creating the buckets is the same for both, the only difference being the name of the S3 bucket itself. To do this, click on the + Create Bucket (blue) button. 1. Name and region Enter your bucket name in the ‘Bucket name’ box (mountainseo.eu and www.mountainseo.eu - as stated above) Select a region, usually the one local to you.

Click next to take you to step 2 - Configure options, click next here and just leave everything as it is, no need to check any boxes Click next to take you to step 3 - Set permissions, click next again here, no need to change any settings. Click next to take you to step 4 - Review, and then click the Create Bucket button the bottom right of the window. That’s it, the S3 bucket is now created. Time to configure it.

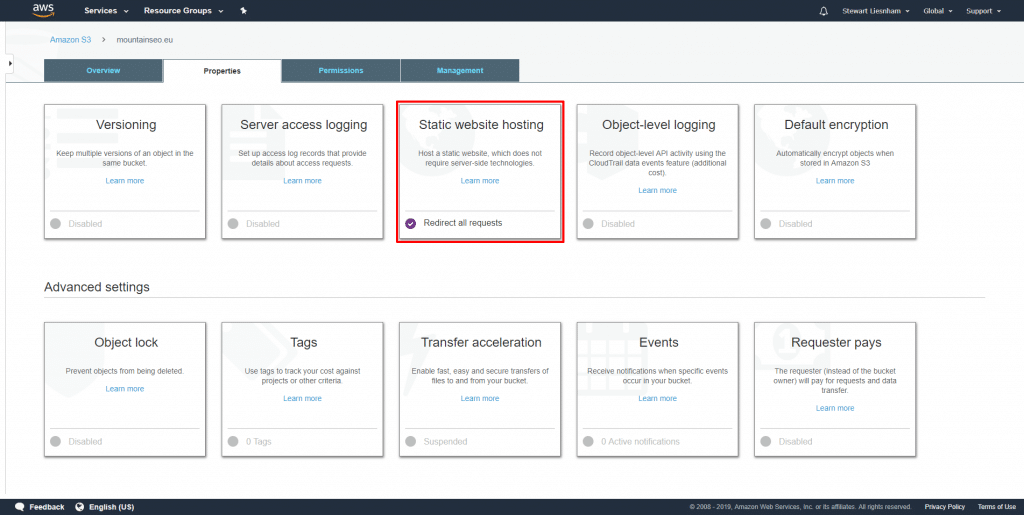
Click on your bucket and this will open the Overview window tab (shown above). Click on the Properties take and select the ‘Static website hosting’ box.
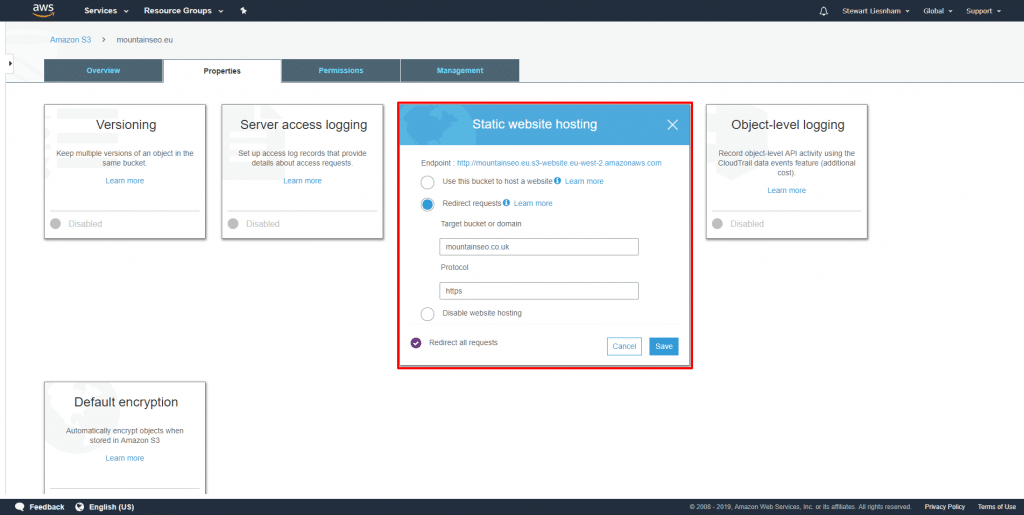
The default option is ‘Disable website hosting’, we need to select the ‘Redirect requests’ option. Select that and then two new boxes will appear. Target bucket or domain: Enter your target URL here, in this case it's mountainseo.co.uk Protocol: Just enter https (if you are still using http, enter this instead) Before you click done, just copy the Endpoint: URL at the top of the Static website hosting box. In this case it’s: https://mountainseo.eu.s3-website.eu-west-2.amazonaws.com And for reference, the other one when set up will be: https://www.mountainseo.eu.s3-website.eu-west-2.amazonaws.com Later you will just need the part eu.s3-website.eu-west-2.amazonaws.com which is the same for both buckets - I explain in more detail later later. Click done and that’s it. The S3 bucket is set up.
Repeat this for the www.domain.co.uk version, all the same details apply to configuring the static website hosting.

Step 3 - Create A-Records in Route 53 Console
That’s both S3 buckets set up and configured. Next, we go to Route53 to configure the (second) domain name - the new one that we want to point to the existing website. Again, go back to your AWS Management Console and select Route 53. Click on your registered domain and then select the new domain that you want to point to your existing Lightsail website instance. Select Manage DNS. Then select Create Record Set. Here we are going to create two new A-Records: mountainseo.eu www.mountainseo.eu For the first one, click Create Record Set and then on the right of the window, we are going to create the new record set. In the Name box, leave it blank. Select Type: A - IPv4 address Check the Alias ‘Yes’ option In the Alias Target box copy the S3 Endpoint address from the S3 bucket you created but leave off the (in this case) https://mountainseo.eu. prefix. You only want to use the s3-website.eu-west-2.amazonaws.com part.

And that’s it. Repeat for the www. version but this time in the Name box add the www and you’re done. The Alias Target is the same as before.

Once the DNS has updated, which should only take a few mins in my experience, your new domain name will be redirecting to your existing website for both www. and non www. versions of your new domain name.
Are you looking for Squarespace SEO Consultant?
As a Squarespace SEO consultant based in the UK, I provide bespoke SEO services that can help your Squarespace website achieve better search engine rankings and increase traffic to your site. With my in-depth knowledge of Squarespace and expertise in SEO, I can help optimise your website for relevant search terms, improve website performance, and enhance your online presence. If you're looking for a Squarespace SEO expert in the UK, get in touch to learn more about how I can help your business succeed online.